Staff are the bread and butter of running a hospital and building a hospital foundation. There are four staff types available: Doctors, Nurses, Janitors and Assistants.
Hiring
Open the 'Hire' screen to employ a new member of staff by clicking on the Hire button in the bottom left corner.
Hire Screen
The top navigation bar helps identify what is represented in the table below. It also allows for sorting from 'High to Low', or 'Low to High' for Ability, Qualifications and Salary.
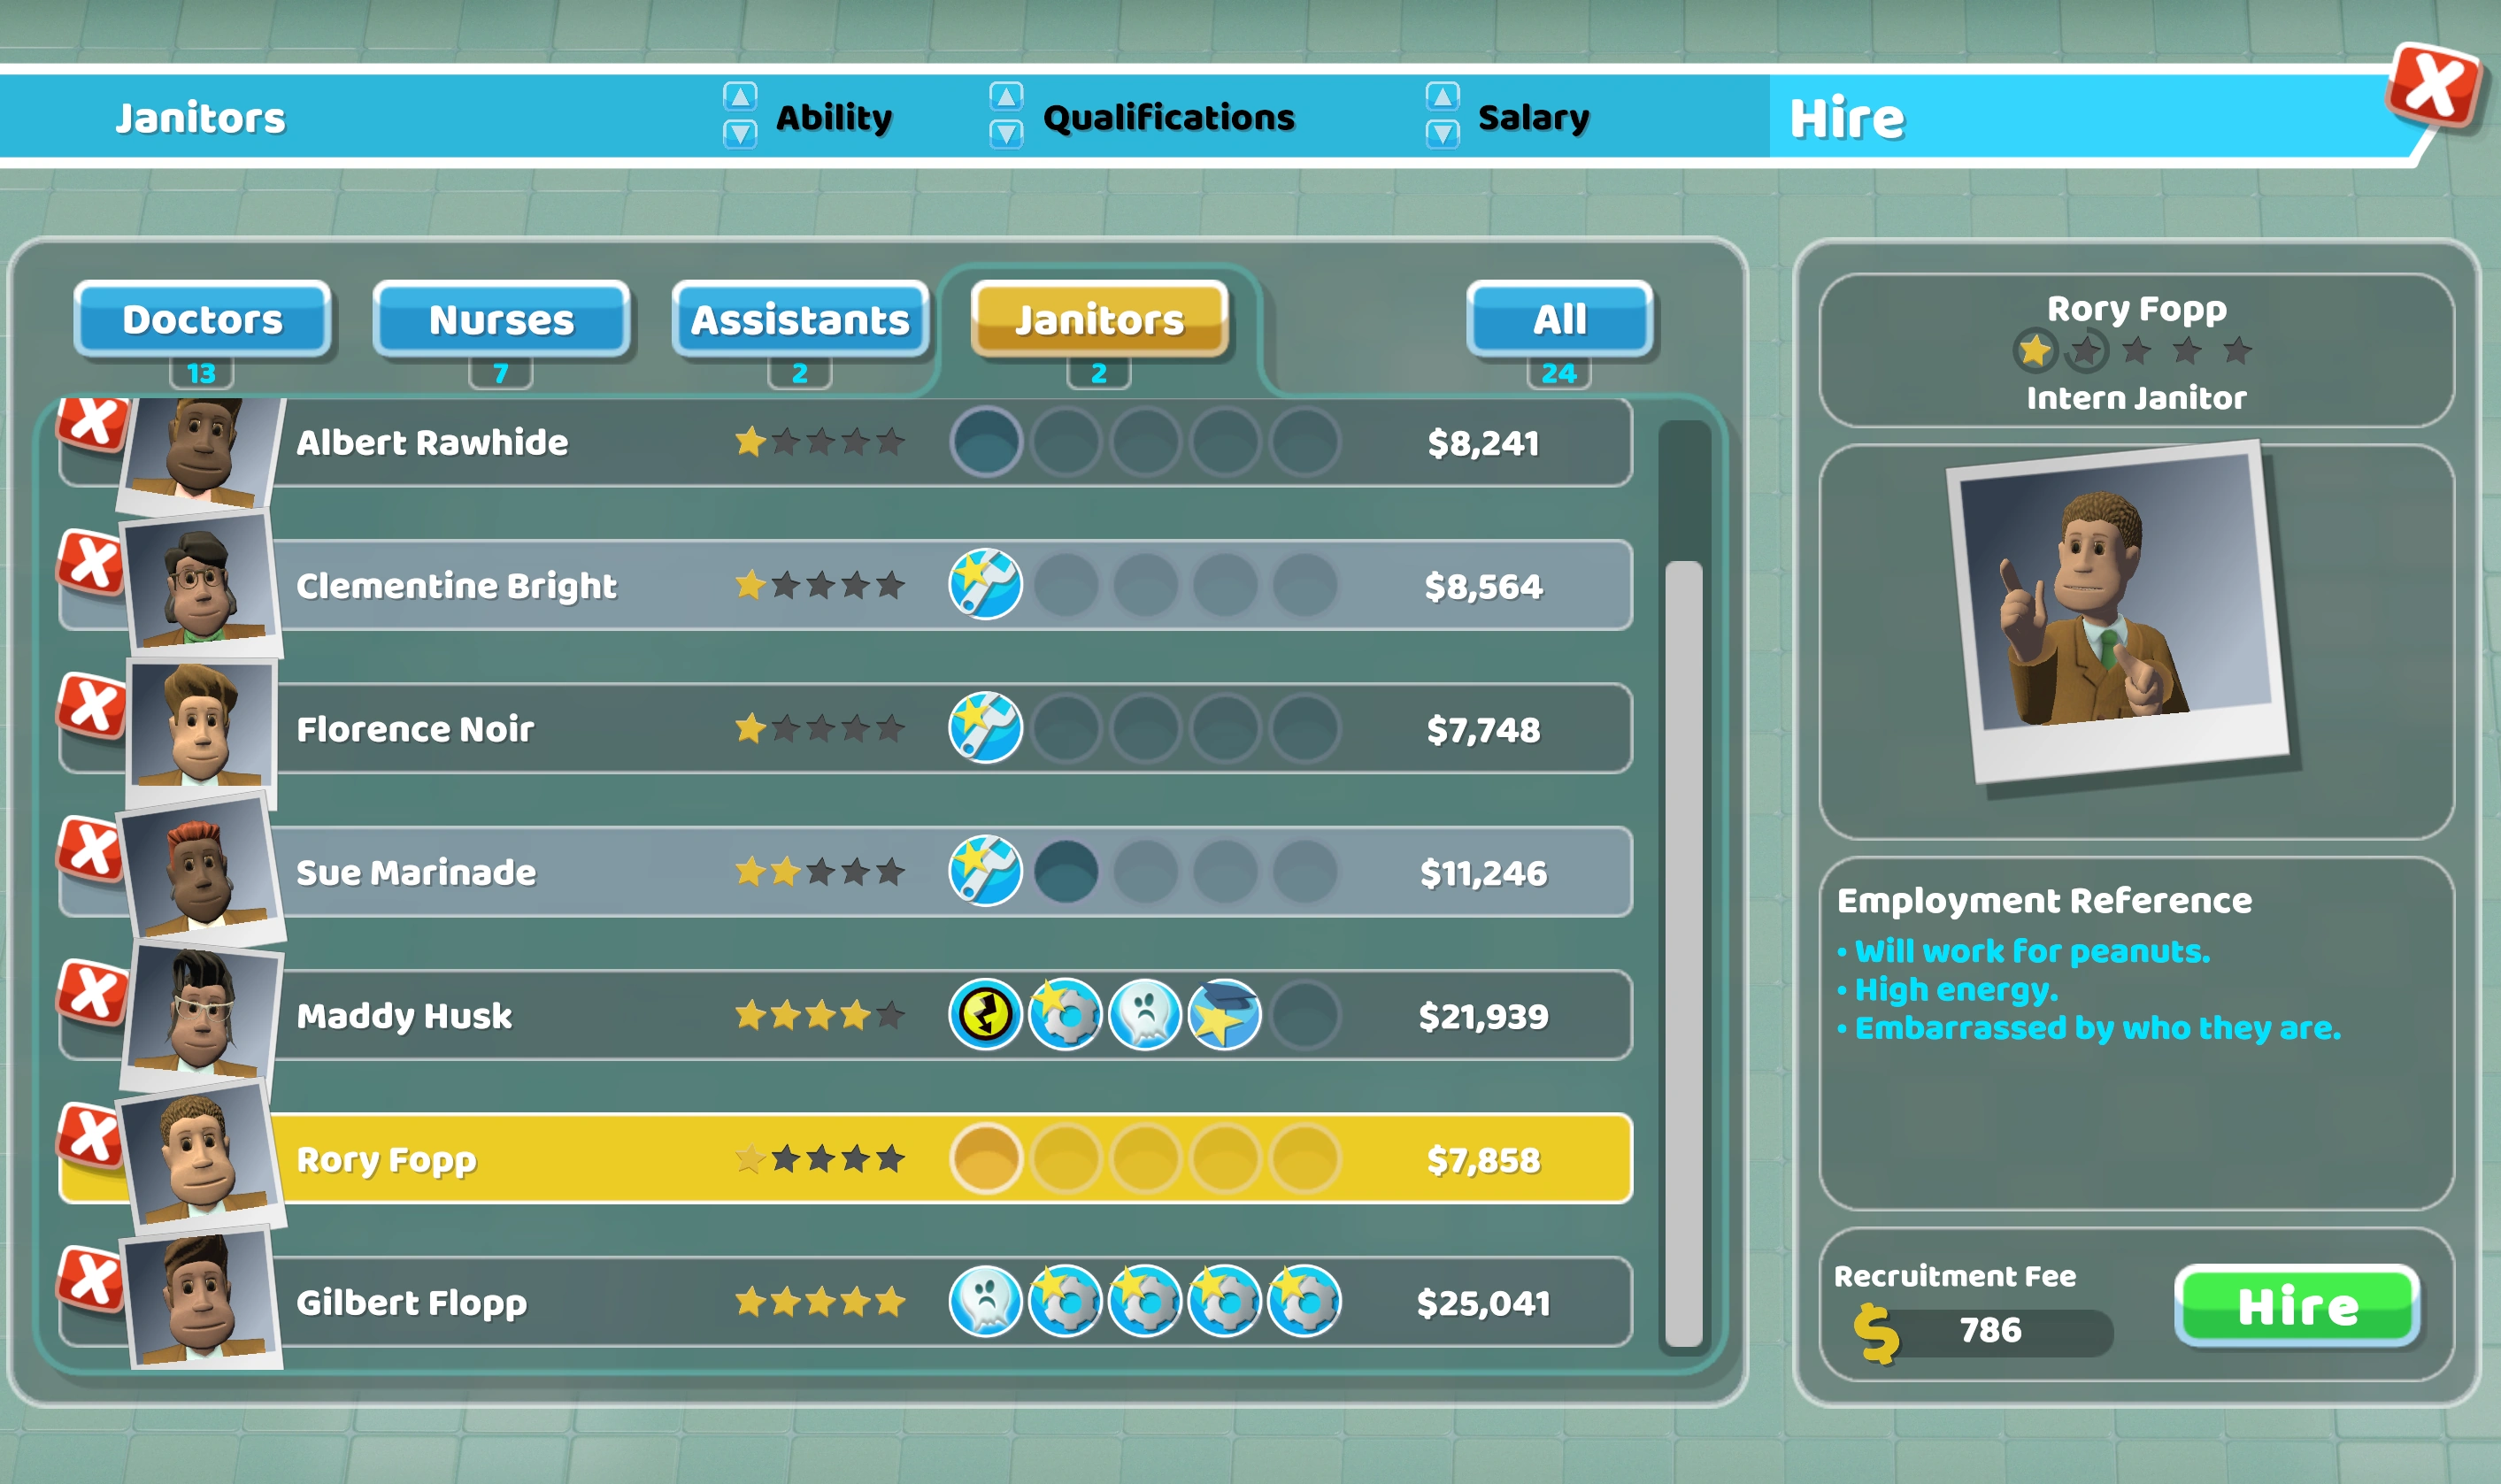
While all currently-available applicants can be viewed by using the 'All' button (as shown in the image above), pressing the buttons for Doctors, Nurses, Assistants or Janitors will allow the selection to be broken down by staff type. The small number displayed under each button is the amount of that staff type currently employed at the hospital.
- For every 5 Hospital Levels gained, 1 new job application slot unlocks for each staff type, with a final total of 8.
- The player isn't the only hospital potential employer in Two Point County. All Rival Hospitals are also seeking staff. Desirable applicants must be recruited quickly, before they disappear for hire.
Applicant
The ![]() next to each applicant's headshot can be used to reject their application, freeing up the slot for a new applicant to apply. A new applicant will apply every 15 days, until all applicant slots are filled. The frequency of applicants can be increased by running Recruitment Marketing Campaigns in a Marketing Room.
next to each applicant's headshot can be used to reject their application, freeing up the slot for a new applicant to apply. A new applicant will apply every 15 days, until all applicant slots are filled. The frequency of applicants can be increased by running Recruitment Marketing Campaigns in a Marketing Room.

- The five stars display the applicant's Ability; the example shown is rank 1 of a possible 5, a Junior Janitor.
- The circles next to ability show the Qualifications that applicant currently holds, one slot per level of rank. If the last active circle is blank, that applicant is ready for immediate training with a new Qualification. Hovering the curser over the next empty circle will display a tooltip confirming 'Ready for Training'.
- The four-to-five-figure sum represents the applicant's base annual Salary. This will rise as they are promoted, and they will likely ask for additional pay rises over time.
Applicant Inspector
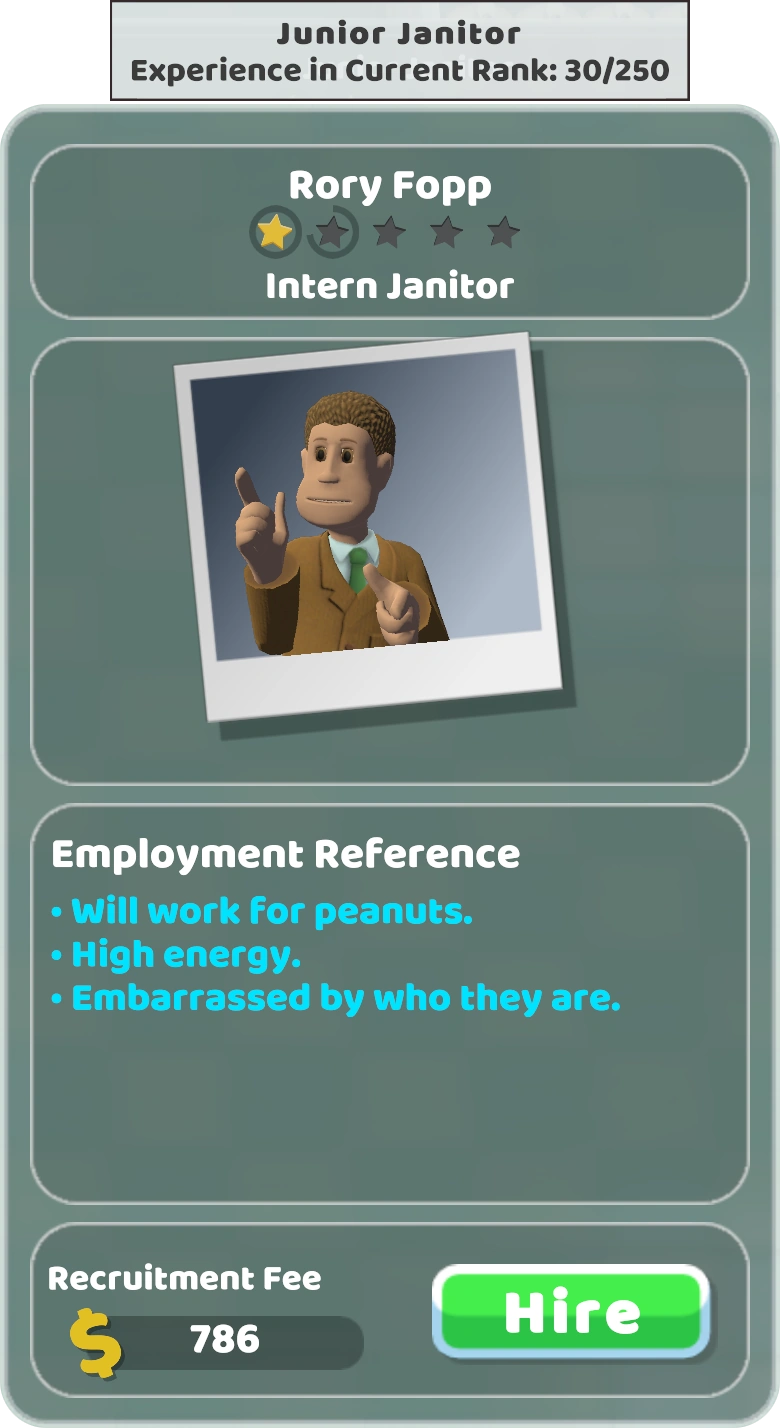
Clicking on an applicant will reveal more details:
- The top box displays their name (which can be changed after hiring), current experience gained in their abilities and their rank.
- The second box is a delightful selfie!
- The third box is Employment Reference, which will list their Traits and generally one flavour text to give you a feel of who they are. The flavour text isn't viewable after hiring, it is just for fun. View a complete list HERE.
- The fourth and last box displays their Recruitment Fee. This is how much it will cost, upfront, to hire the applicant. So, while you won't need to pay their annual salary right away, this money will need to be available now. Also in this box is the 'Hire' button.
Clicking on Hire will see the staff member attached to the curser ready for placing at the desired position in the hospital - or just dropped in a corridor, so they can find their own way. For more details on how best to utilise this feature, see the individual staff articles. Doctor, Nurse, Janitor and Assistant.
- Tip: Shaking them vigorously while on the curser will cause the poor Pointian to become nauseous and may even vomit after placement.
- Tip: Employing staff will increase the Hospital Level. Employing Doctors and Nurses gives a larger boost than that for Janitors and Assistants.
Staff Inspector
The staff inspector is the paperdoll style information panel that pops up upon selecting a member of staff, displaying everything there is to know about them.
Main Header
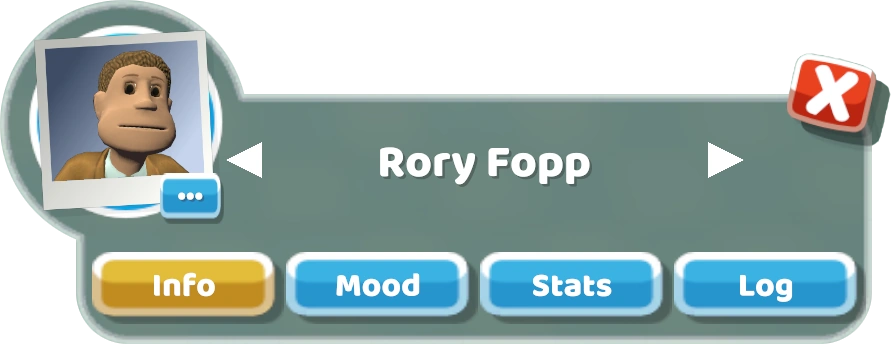
The main header of the staff inspector displays their current selfie. Clicking on the selfie will centre on and follow the member of staff. The header also displays their name, and allows the player to jump to another member of staff using the left and right arrows either side of their name, which will cycle through them in recruitment order.
The ![]() button will close the staff inspector, or the player can browse the four tabs provided - Info, Mood, Stats and Log - to learn much more about the member of staff.
button will close the staff inspector, or the player can browse the four tabs provided - Info, Mood, Stats and Log - to learn much more about the member of staff.
Info Tab
Training Overview
- Main article: Staff Training
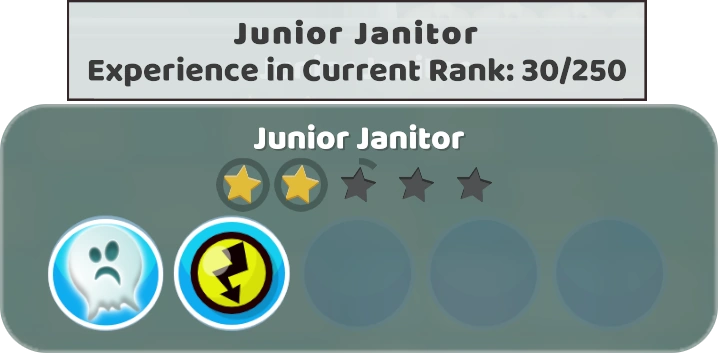
The first section shows the staff member's;
- Rank title
- Ability stars
- Qualifications gained and a possible open Training Slot.
- In addition, experience will display as a tooltip if the curser is over the ability stars.
Salary Overview
- Main article: Salary


This displays the current amount the staff member is paid per annum. The face lets you know how they feel about their current pay levels.
Moving the slider to the right will propose a pay increase to the member of staff, with the face changing to reflect their satisfaction with the new amount. Clicking on the bright green tick will confirm the changes.
At Work Overview

The final section covers their current 'at work' state. First is their current working task; this Janitor is currently mopping up an indiscretion.
Next, their current Happiness and Energy levels are displayed. Hovering over them will display a tooltip confirming the exact percentages. This janitor is 69% happy and has 69% energy remaining. Nice!
What a staff member is currently feeling will be displayed here. These feelingscan have a positive or negative effect on their workflow. Hovering over will show a tooltip giving details of how their feelings are impacting them and their work.
All staff have Traits; having a permanent and constant impact on the staff member and their performance, hovering over will show a tooltip giving details of how they are being affected by their traits.
Mood Tab
Happiness & Energy

The current Happiness and Energy levels are displayed. Hovering over them will display a tooltip confirming the exact percentages. This janitor is 69% happy and has 69% energy remaining. Nice nice!
Needs
- Main article: Needs

This section shows the staff member's current levels of Hunger and Thirst, along with their Toilet Need .
- Red - The need is urgent. Related Complaints: Very Thirsty, Very Hungry, Desperate for the toilet.
- Yellow - Below comfortable. Related Complaints: Thirsty, Hungry, Needs the toilet.
- Green - No need in this area. No Complaints.
Environment
- Main article, see Environment

In this section, a staff member's Hygiene level is displayed, along with how Attractive they are finding the part of the hospital they are currently in and how comfortable its Temperature.
If the hygiene and hospital attractiveness bars are low and red, then the staff member is filthy dirty and finds the hospital ugly, if their bars are high and green, it means they are squeaky clean and find the hospital extremely pleasant.
Slightly different however; if the temperature bar is low it means they are very cold, if the bar is high, they are too hot. Aiming to keep the temperature bar in the middle is best. The Temperature Visualisation Mode can be used to check for problem areas.
Top Complaints & Positives
- Main article: Complaints & Positives
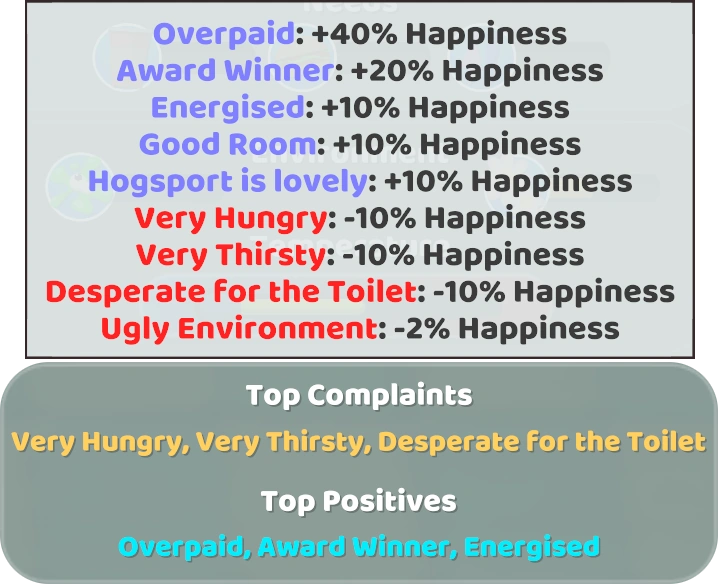
Here the staff member can make their thoughts known directly, either by a complaints or by praise with a top positive. Hovering over, with the curser, will display a tooltip with exactly what impact these complaints and positives are having on the staff's overall Happiness.
Visit the main article for more in-depth detail. This includes a list of Top Complaints and Top Positives, along with what impact they have on the staff's happiness.
Stats Tab
Employment & Salary
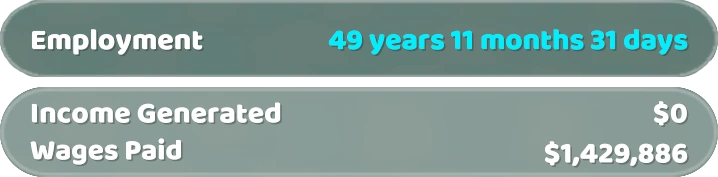
Employment shows how long the member of staff has been working at the hospital.
Total Income shows how much money the staff member has generated during their employment, while Total Paid displays how much they have cost in wages to employ. Assistants and Janitors do not generate income, nor do Doctors working in Research (unless they are working on cash projects, which are not registered here). Other Doctors and Nurses should be generating more money than they are paid.
Statistics
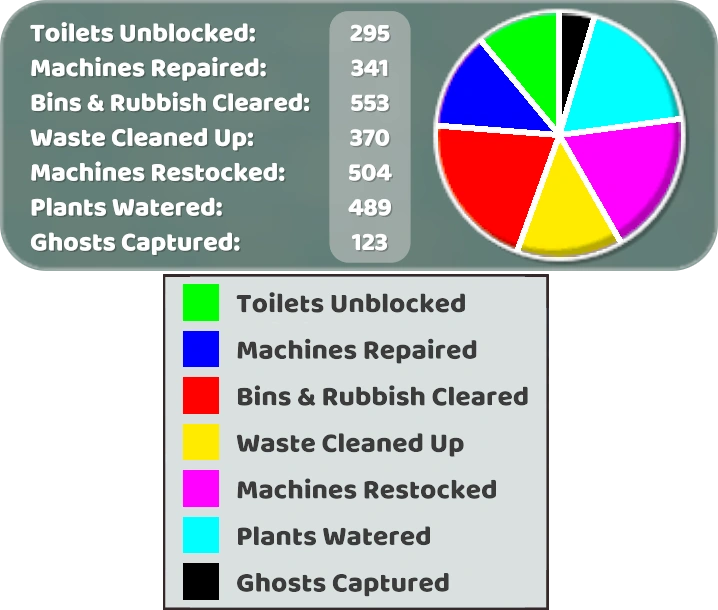
This section different between staff types, the contents reflecting the specific tasks undertaken. A tooltip with the pie chart legend displays when hovering over it with the curser.
This example is from the Janitor recruited above, Rory Fopp. He has been working in the hospital for long enough to have completed every janitorial task at least one hundred times. That's a lot of Ghosts!
Employment Awards The number of Training courses the staff member has attended since being employed and how many Promotions they have received are specified here.
Awards won is how many awards that member of staff has won via the Hospital Awards Ceremony. The image is an example, once more, from Rory Fopp. He has won Janitor of the Year 20 times! Didn't he do well?
Skills
- Main article: Staff Skills
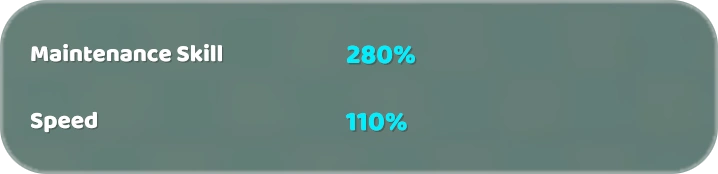
The last sections displays the percentage level of each skill and their overall speed buff. Again, the skill types listed are different depending on the staff member being inspected.
Log Tab
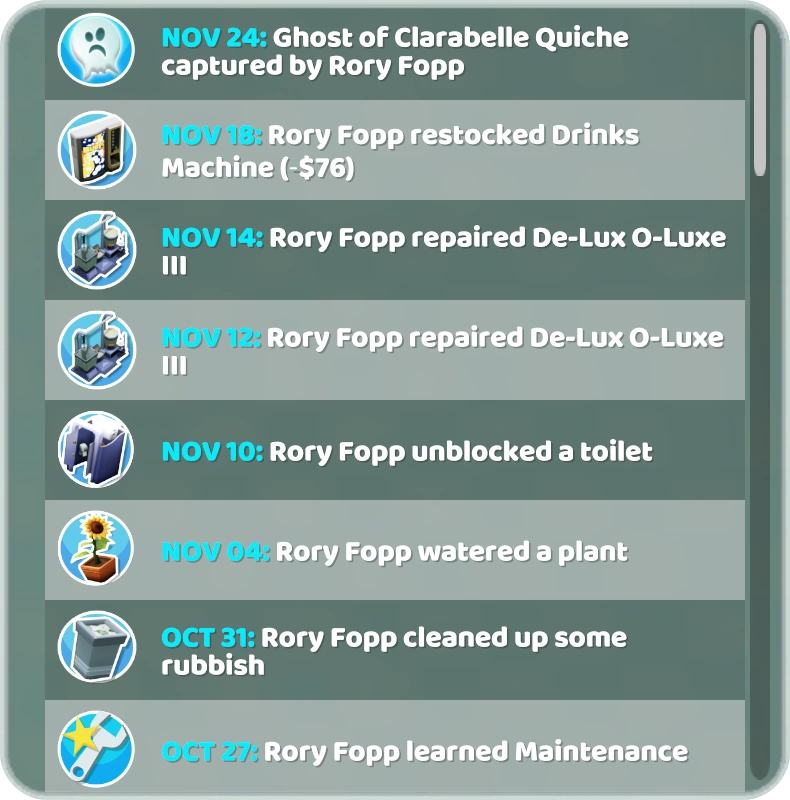
The log tab is just that, a log of everything that staff member has been doing and when. Certain important tasks, such as promotions, training sessions and award wins will stay on the log permanently, others will disappear once they leave the front screen.
The first column displays the Icon of the task performed. Then it lists the month and day this task was completed, followed by a short summary of the task itself. Rory Fopp again provides our example; It even specifies the name of the patient's ghost that Rory has captured.
All staff logs feed into the main Overview Log, so they can be seen all together and in order. Never miss a thing.
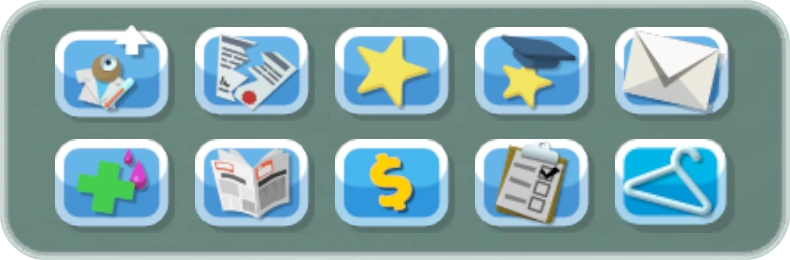
There are ten spaces on the footer for Action Buttons; Staff will use all ten.
Pick Up: Pick up the member of staff so that they can be put to a particular task.
Fire: Send a member of staff packing. They will attempt to lay a guilt trip on the player.
Promote: This member of staff has gathered enough XP to complete their current level, and are ready for Promotion - and ideally, a pay raise.
Train: This member of staff has gathered enough XP to complete their current level, but need training, to fill their empty training slot, before they can be promoted to the next level and start gaining XP again.
Open Message: Read the letter this member of staff has sent (proposing a Staff Objective, for example).
Vaccinate: Only appears when an Epidemic is active. Administers a dose to this Pointian.
![]() Take a Break/Return to Work: Unlike other buttons, this is a toggle. A member of staff can be manually put on break, or put back to work.
Take a Break/Return to Work: Unlike other buttons, this is a toggle. A member of staff can be manually put on break, or put back to work.
Pay Review: Opens the Pay Review screen, with the focus on this member of Staff.
Jobs: Opens the Job Assignment screen, with the focus on this member of Staff.
Staff Customisation: Opens the Staff Customisation screen, with the focus on this member of Staff.
Staff List
At the top-left of the Staff List screen are three buttons, used to switch between the three tabs of the Staff List:

Staff List: A list of Staff, their rank, skills, current abilities and wellbeing.
Pay Review: For reviewing staff wage satisfaction and overall happiness
Jobs: For selecting job assignments for individual members of staff
Each page also has five button to the right of these, for filtering by each staff type. The main Staff List and Pay Review tabs also allow use of the 'All' button, to view all staff in one list. The numbers below the staff buttons reflect how many of each staff type is currently working in the hospital, with the 'All' button representing how many staff are working in the hospital in total.
The top navigation bar helps identify what is represented in the table below. On the main Staff List, this allows for sorting from 'High to Low', or 'Low to High' for Ability, Qualifications, Happiness and Staff Energy.
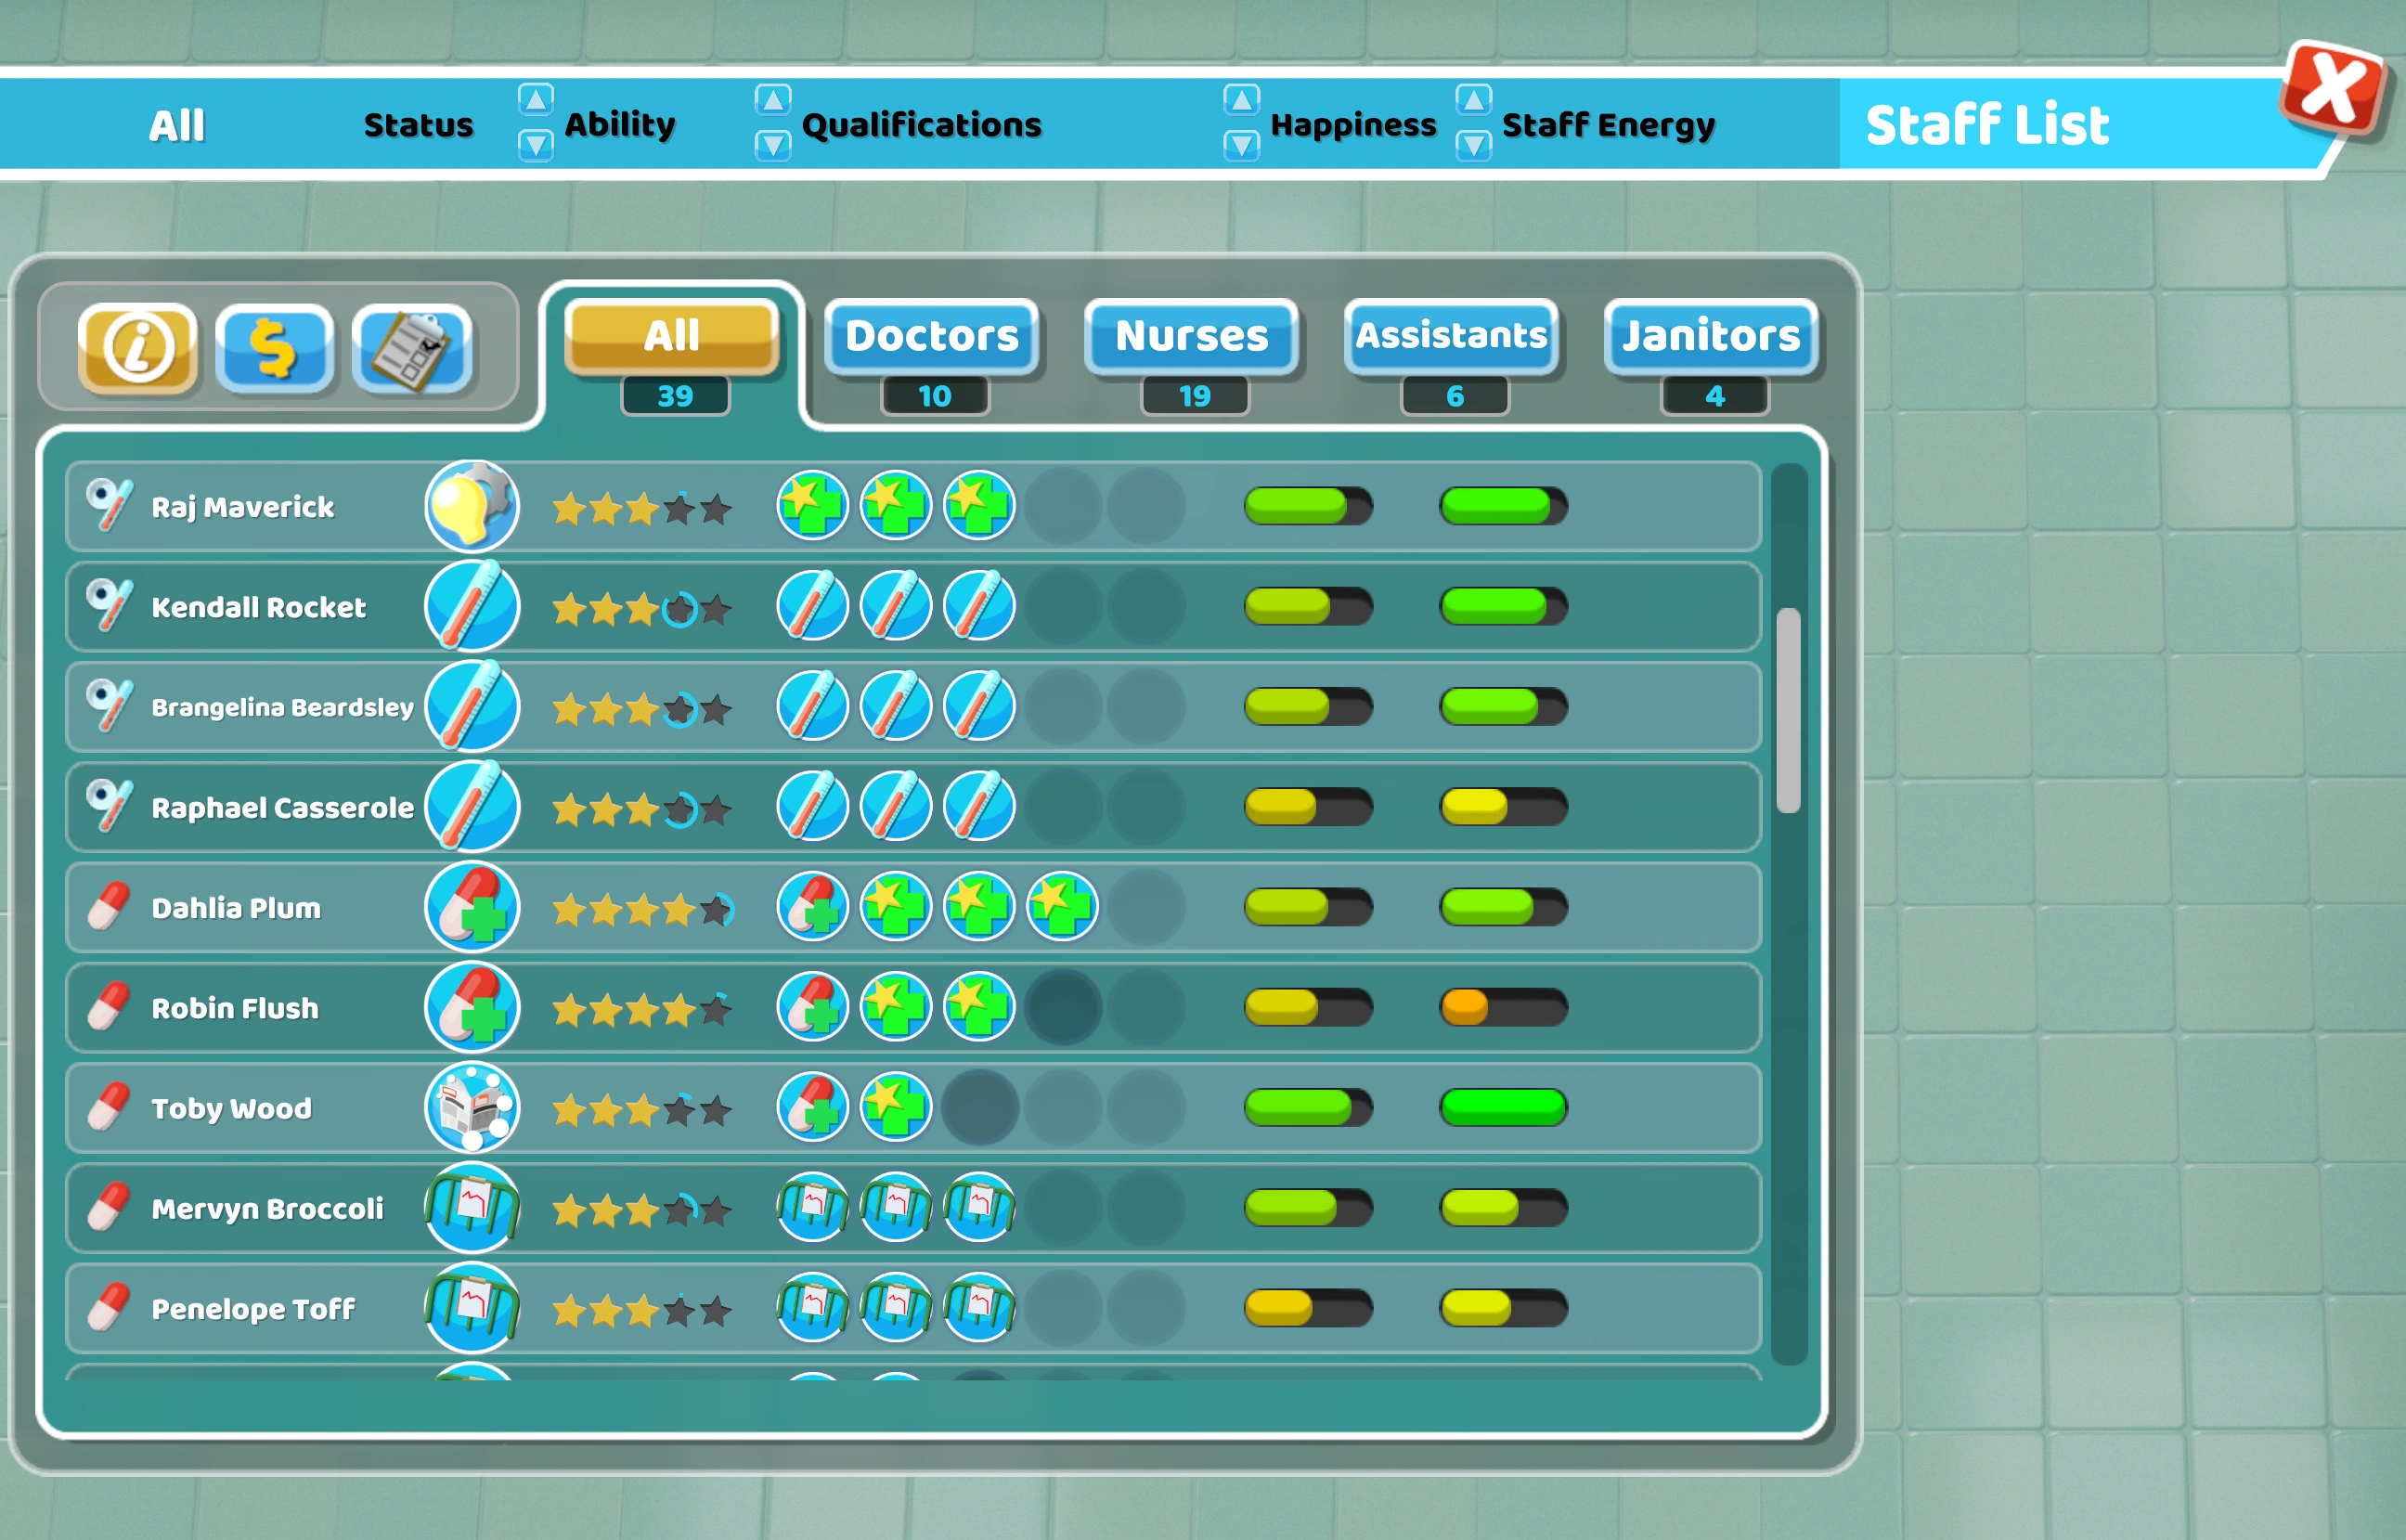
The staff information bar gives a quick overview of each staff member's basic details. The first information displayed is the staff type, using a Staff Icon. Raj Maverick, in the example, has the ![]() icon, meaning he is a Doctor. After the name is an Icon displaying in which room they are currently performing, or other status icon, such as a Training or On Break. Toby Wood, for example, is 'On a Break (On Call)'.
icon, meaning he is a Doctor. After the name is an Icon displaying in which room they are currently performing, or other status icon, such as a Training or On Break. Toby Wood, for example, is 'On a Break (On Call)'.
The stars represent their current Ability level. The number of yellow stars ![]() represents the current rank, with grey stars
represents the current rank, with grey stars ![]() showing levels yet to be reached. The partially-formed blue circle around a grey star shows the amount of experience gained towards the next level. Once this is complete and the staff member is ready to promote, the star will turn blue
showing levels yet to be reached. The partially-formed blue circle around a grey star shows the amount of experience gained towards the next level. Once this is complete and the staff member is ready to promote, the star will turn blue ![]() until the promotion is given, as shown in this example with Dennis Lion:
until the promotion is given, as shown in this example with Dennis Lion:
The five circles show the staff member's Qualifications. Having promoted Dennis Lion, he has gained a new empty Qualification slot, shown by one of the empty circles being replace with a dark blank; the tooltip this dark circle provides shows that he is 'Ready for Training'.
The last two bars display their current Happiness and Energy levels, helping to quickly identify any problem areas.
Pay Review
Pressing ![]() to access the Pay Review tab reveals a screen with much of the same information, slightly shuffled around. The Energy bar and job icon are gone, replaced by Salary, which can also be used for sorting via the top bar; in addition, a button above the list itself is used to Satisfy Pay Requests, and a footer panel features a financial overview.
to access the Pay Review tab reveals a screen with much of the same information, slightly shuffled around. The Energy bar and job icon are gone, replaced by Salary, which can also be used for sorting via the top bar; in addition, a button above the list itself is used to Satisfy Pay Requests, and a footer panel features a financial overview.
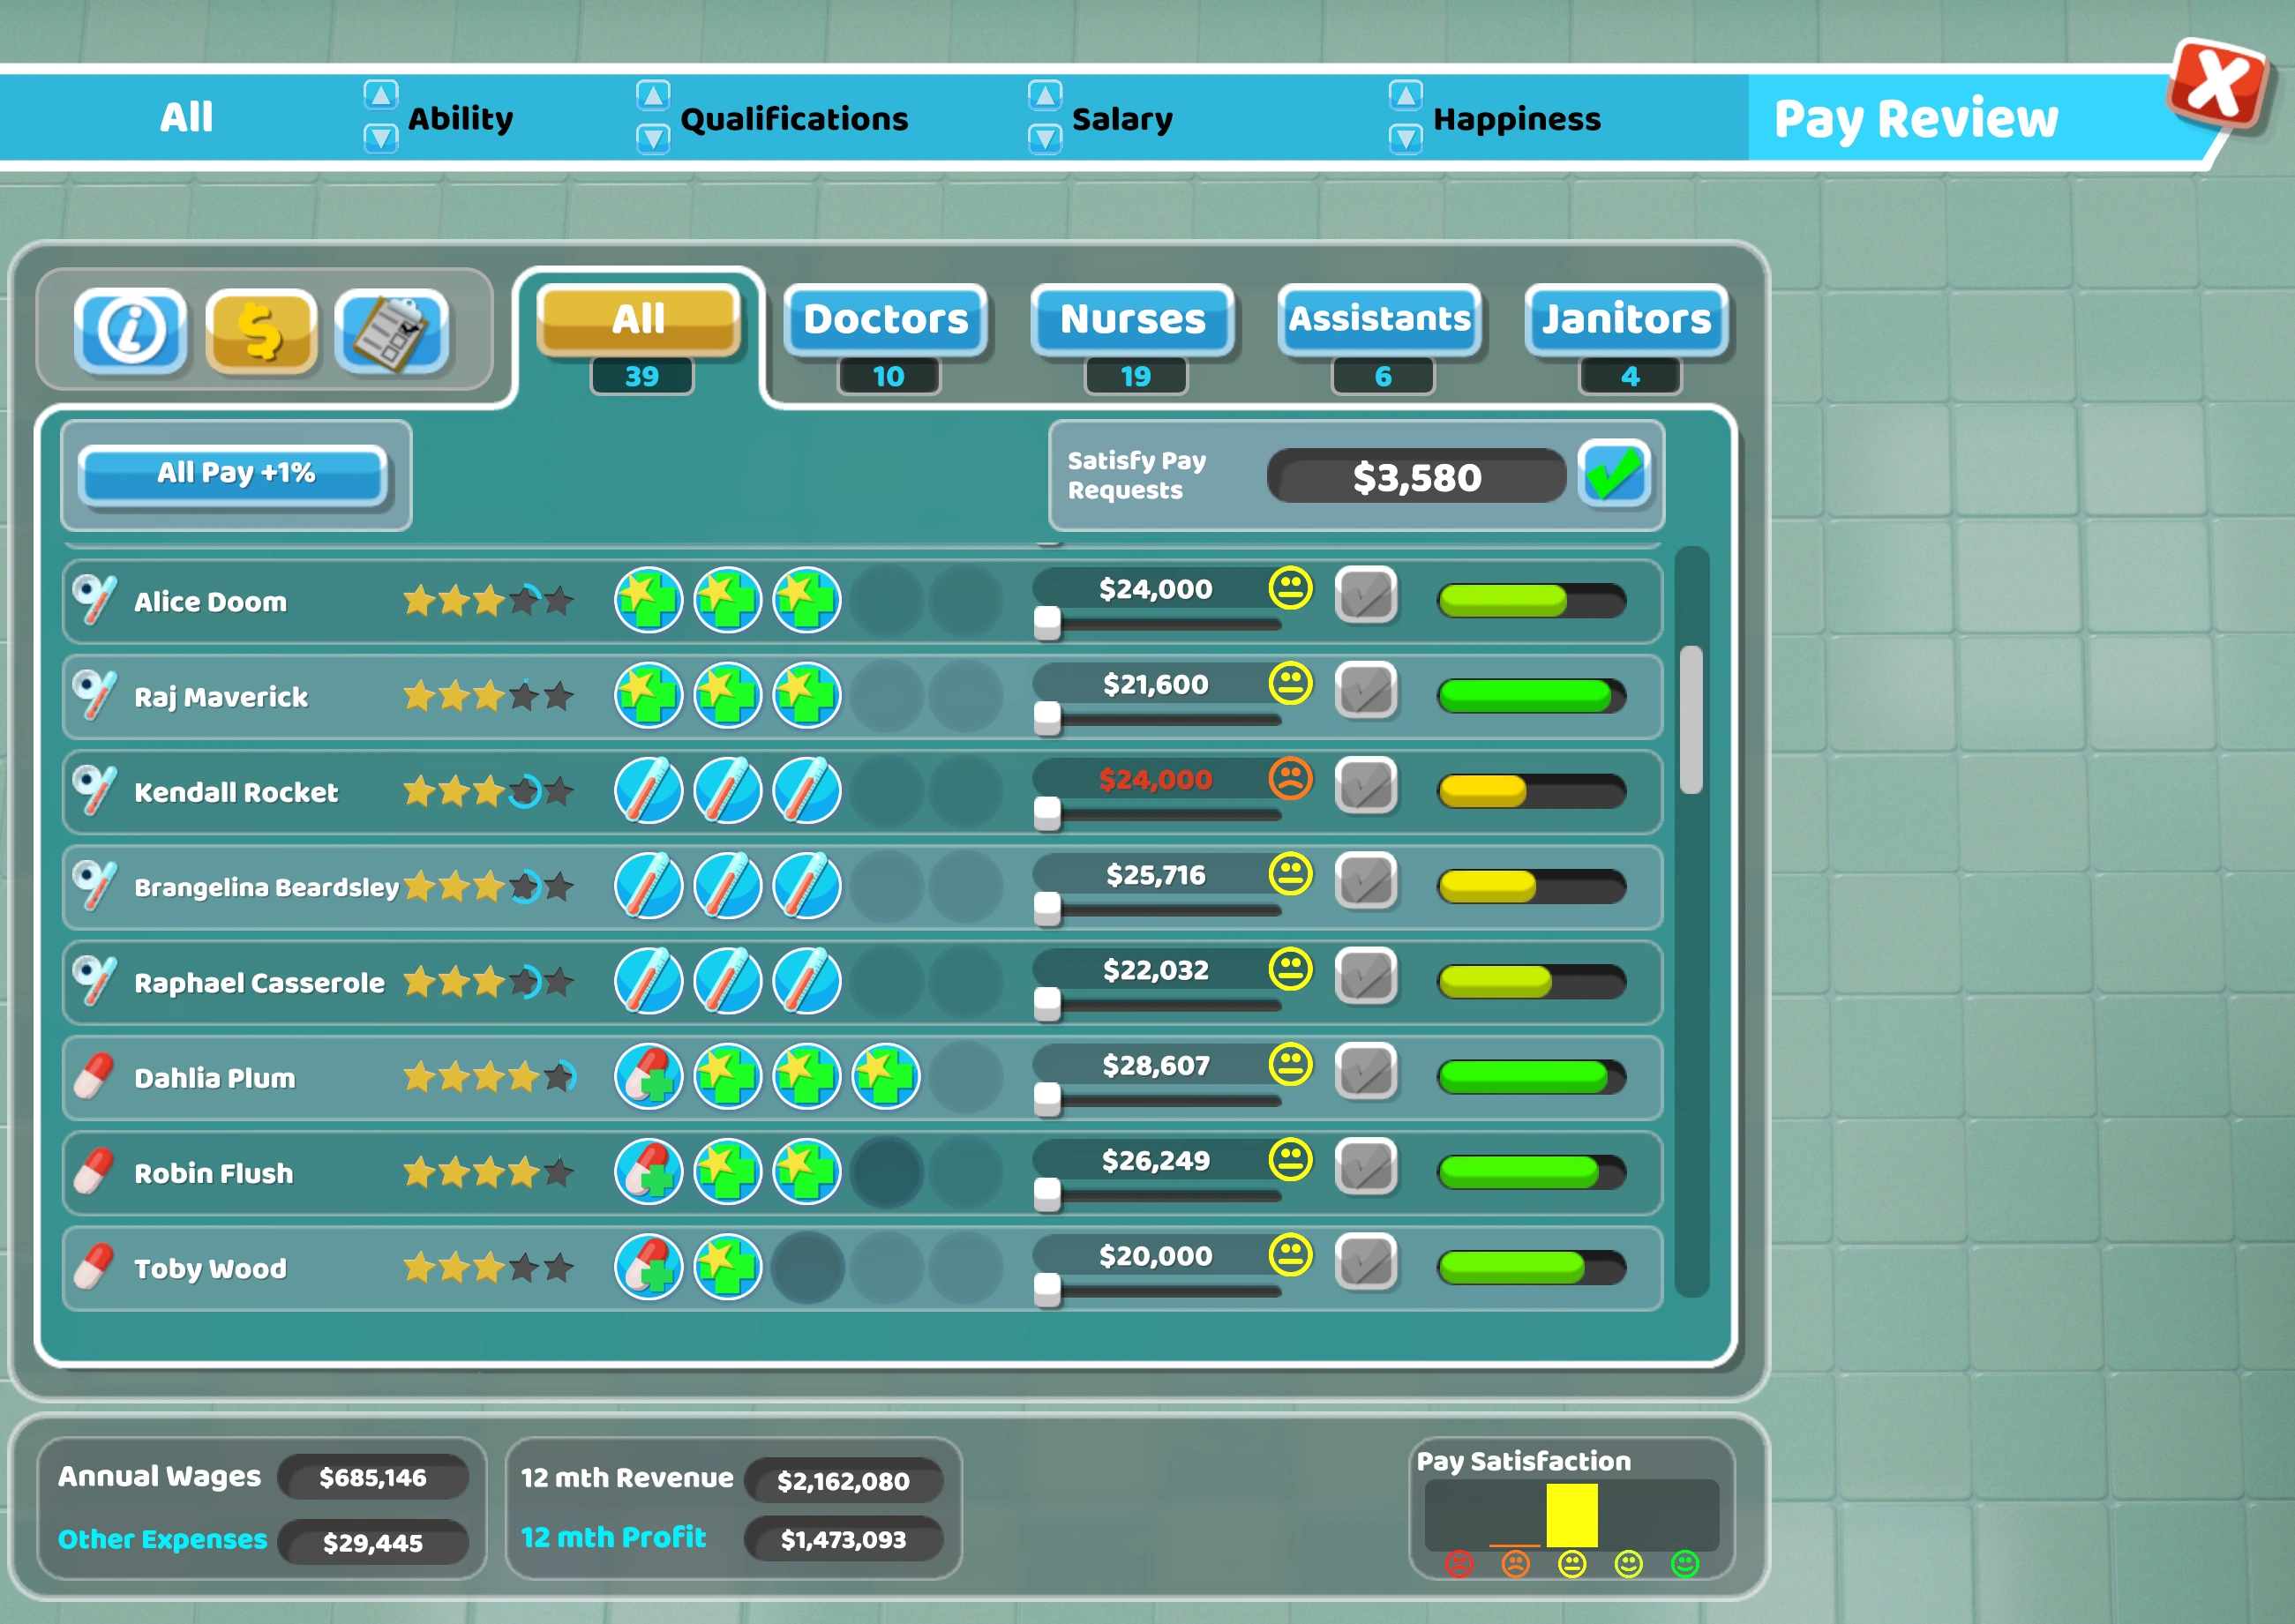
The staff information bar features much of the same information as the main Staff List tab. The Salary section is the main focus of this tab. It represents how much the staff member is being paid, with a face expressing their level of satisfaction with the salary. Moving the slider to the right will propose a pay increase to the member of staff, with the face changing to reflect their satisfaction with the new amount. Clicking on the bright green tick will confirm the changes. Dennis Lion is happy at the prospect of a 10% bump!
Satisfy Pay Requests

For ease of use and to reduce searching, this box can be used to check if any staff are asking for a raise. If it reads $0 and the tick box is greyed out, all staff are at least satisfied with pay or above. If there is a figure in the box and the green tick highlighted, it means there are staff unhappy with their pay and this is how much it will cost to bring them up to the 'Satisfied' level of Pay Satisfaction. Clicking the green tick confirms the raise and commits to this extra monthly expenditure.

The footer of this screen displays three things. The first box specifies the yearly outgoings. The Annual Wages shows how much is currently being paid to all staff each year. The Other Outgoings is a total of all other annual costs to the hospital, mainly energy costs. Income and outgoings can be reviewed in detail on the Overview Log screen.
The second box displays the 12 mth Revenue. This is a gross sum, meaning before expenses. Once expenses have been deducted, the net sum remains, which is the Yearly Profit. These figures are extremely helpful as a reference when weighing up an increase to staff wages.
The last box is a quick reference of viewing staff's Pay Satisfaction levels. In the sample given, a small number of staff are 'Unhappy' with their pay, which is why the Pay Requests box is active. Most staff are 'Satisfied'; none are 'Very Unhappy', but none are 'Happy' or 'Very Happy' either.
Job Assignment
The third and final screen of the Staff List is accessed by pressing the ![]() button. The Staff Icons, Names, Ability levels and Qualifications are found on the left-hand side, and function the same as on the main Staff List screen. The top navigation bar will only allow sorting by Ability and Qualifications. Note that on this screen, the 'All' filter button is inactive, as each staff type has different Job Assignments. The screens for Doctors and Nurses include additional filters: 'Diagnosis' and 'Treatment' filter for staff trained in corresponding qualificatinos, and 'All' will include the entire list of that staff type.
button. The Staff Icons, Names, Ability levels and Qualifications are found on the left-hand side, and function the same as on the main Staff List screen. The top navigation bar will only allow sorting by Ability and Qualifications. Note that on this screen, the 'All' filter button is inactive, as each staff type has different Job Assignments. The screens for Doctors and Nurses include additional filters: 'Diagnosis' and 'Treatment' filter for staff trained in corresponding qualificatinos, and 'All' will include the entire list of that staff type.

The main feature of this screen is the large grid detailing the assignments themselves. Along the top of the grid are icons representing the different rooms and tasks to which a staff member can be assigned. In the example shown, the staff members focused on are the Doctors. As this is from a conventional Hogsport playthrough, the Doctors only have two usable assignments, the GP's Office and the De-Lux Clinic.
Each box on the grid is a toggle, with ![]() meaning the assignment is set, and
meaning the assignment is set, and ![]() meaning it is not. A smaller, darker box means that the assignment is not available at all, since that room is not built or the task is otherwise disabled in the current hospital.
meaning it is not. A smaller, darker box means that the assignment is not available at all, since that room is not built or the task is otherwise disabled in the current hospital.
By default, upon hiring a new member of staff, they will be set to work in all rooms (or tasks) they can. It is up to the player to assign certain job roles to some staff and restrict them from others, should they wish.
Please see the respective page for each staff type to view their particular job assignments.
Staff Training
To get the most out of staff, they will need promotion and training. When a staff member has gained enough experience on the job, and had some training, they will be ready for promotion. By promoting them, their skills increase and they are able to learn a new qualification. They might also want a pay rise. Training is a large topic; as such, there are multiple pages to visit:
- Training Room: Covers the room itself
- Staff Training: Lists courses, but also includes ability, experience, promotions & more.
The pages for each staff type also cover training to a small degree. This includes a list of qualifications each staff type can gain, their ranks and qualifications best suited to which jobs.
Salary

The level of a staff member's salary satisfaction will affect their happiness, positively or negatively. This can be both viewed and adjusted, either on the Info Tab of the Staff Inspector, or the Pay Review tab of the Staff List. Both will use a visual indicator of the staff member's salary satisfaction:
|


Happiness
- Main article: Happiness
A happy member of staff is a more efficient member of staff. Every aspect of their Needs, Environment and Complaints/Positives contributes to their overall Happiness, all of which is best monitored on the Mood Tab of the Staff Inspector.
Comfort feeds directly into happiness. Seating Items are marked 'Increases comfort'; this only means that using them will increase a staff member's happiness. In regards to patients, sitting will slow the rate at which their happiness will fall.
Energy
- Main article: Energy
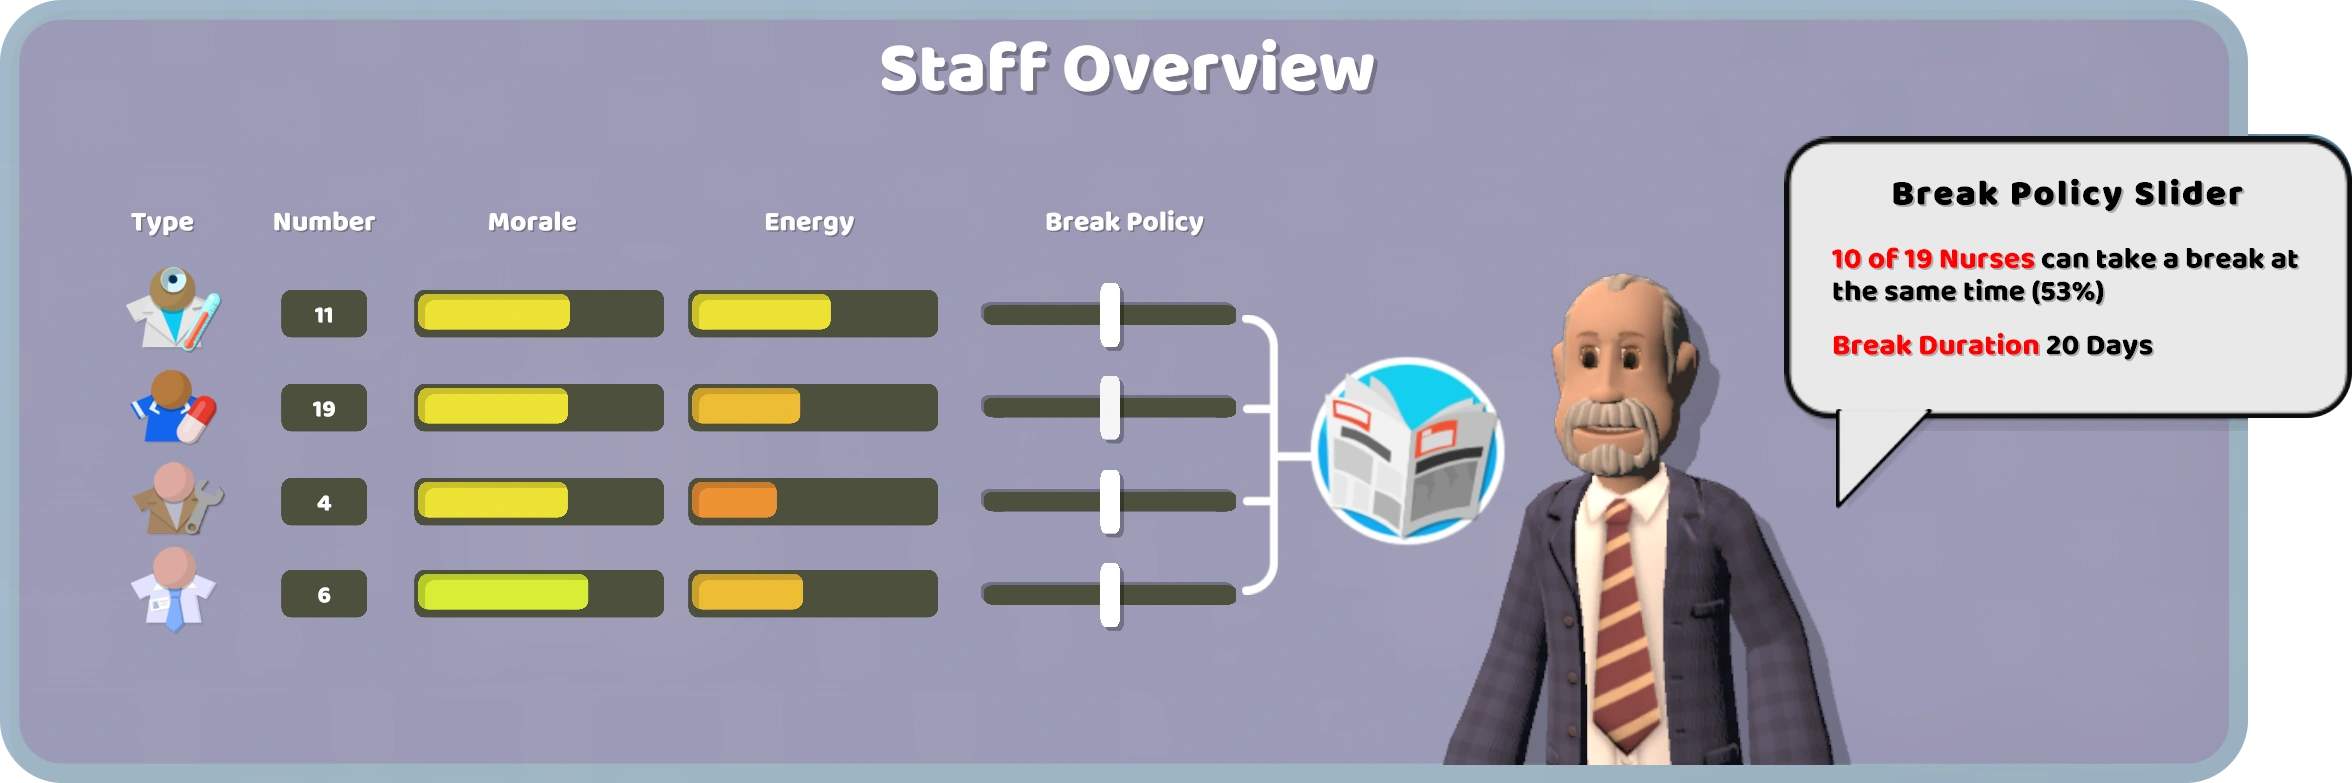
Staff get tired as they work, and, when their energy is low, will go on break. as long as there aren't too many staff of that type already on break. The Staff Overview Screen allows the player to adjust how many member of staff of each type can be on their break at once.
A Staff Room will help them relax and, assuming they are at least at 80% energy when they return to work, they will do so with the Energised Feeling.
Feeling
- Main article: Staff Feelings
There are many feelings that can affect members of staff, which can be beneficial, impedimentary or neither. The above link features a list.
The Info Tab is used to display these Feelings on the Staff Inspector, with detailed effects shown in a tooltip when holding the cursor over this section.
Traits
- Main article: Traits
Staff will usually have between 1 and 3 Traits, which are permanent and unchangeable. They can have positive and negative effects, such as increasing or decreasing Movement Speed, rate of Energy loss, efficiency in the Training Room, and so on. All traits are listed on the page linked above, including how to spot them on the Hiring Screen
The Info Tab is used to display these Traits on the Staff Inspector, with detailed effects shown in a tooltip when holding the cursor over this section.
Needs
Needs are detailed on the Mood Tab of the Staff Inspector; they will decline steadily over time, at variable rates. For example, if a member of staff is working in a room that is too hot, their thirst will increase more rapidly than if they were in a comfortable temperature. If Needs go unmet, the staff member's overall Happiness will fall at an increased rate.
For the most part, Staff will wait until their break to satisfy their needs. Some Food & Drink items can be placed in rooms where staff are working, such as Drinking Fountains and Sweet Dispensers, but staff may often neglect to use these unless they have no patients pending - which is rare! Of particular note is the Coffee Maker, which staff will often play with, but not actually drink from, if there is a queue outside.
Also of note is that some methods of satisfying Needs will negatively affect others. For example, using the Fancy Food Machine will reduce a Pointian's hunger by 80%, and increase their happiness by 30%, but will also increase their thirst by 70%. As such, it is important to choose carefully how these Needs will be met.
Thirst
Staff become thirsty if there aren't enough items that reduce Thirst, such as Drinks Machines or Drinking Fountains.
Hunger
Staff become hungry if there aren't enough items that reduce Hunger, such as Snack Machines or Sweet Dispensers.
Toilet Need
Staff will become desperate and go on the floor if there are not enough Toilets. They also will not use Toilets that have become clogged, so regular maintenance by Janitors is vital.
Complaints & Positives
- Main articles: Complaints & Positives
A member of staff will always make their thoughts known on the Mood Tab of the Staff Inspector. There, the player can find a list of Top Complaint and Top Positives, so as to learn which areas need improvement. The above links contain lists of possible entries for both.
Staff Objectives
- Main article: Staff Objectives
On occasion, a Staff member will send a letter, offering a time-limited challenge. The reward is often increased Happiness for the staff member who made the request and additional Kudosh for the Foundation.
There is no penalty for rejecting a Staff Request or failing to complete it before time runs out. It is also possible to wait to open the letter, delaying the request until a more opportune time to attempt it.
Quitting & Firing
- Main article: Resignation Threat
When a staff member's Happiness drops too low, they will send the player a letter, threatening to quit. They will give the player 90 days to increase that staff member's happiness to at least 20%. The letter will specify the Feelings causing the staff member problems.
If a member of staff is surplus to requirements, they can be let go by the player. The ![]() button on the Staff Inspector's Actions Footer is used for this. The staff member will attempt to lay a guilt trip on the player, be warned!
button on the Staff Inspector's Actions Footer is used for this. The staff member will attempt to lay a guilt trip on the player, be warned!
Staff Customisation
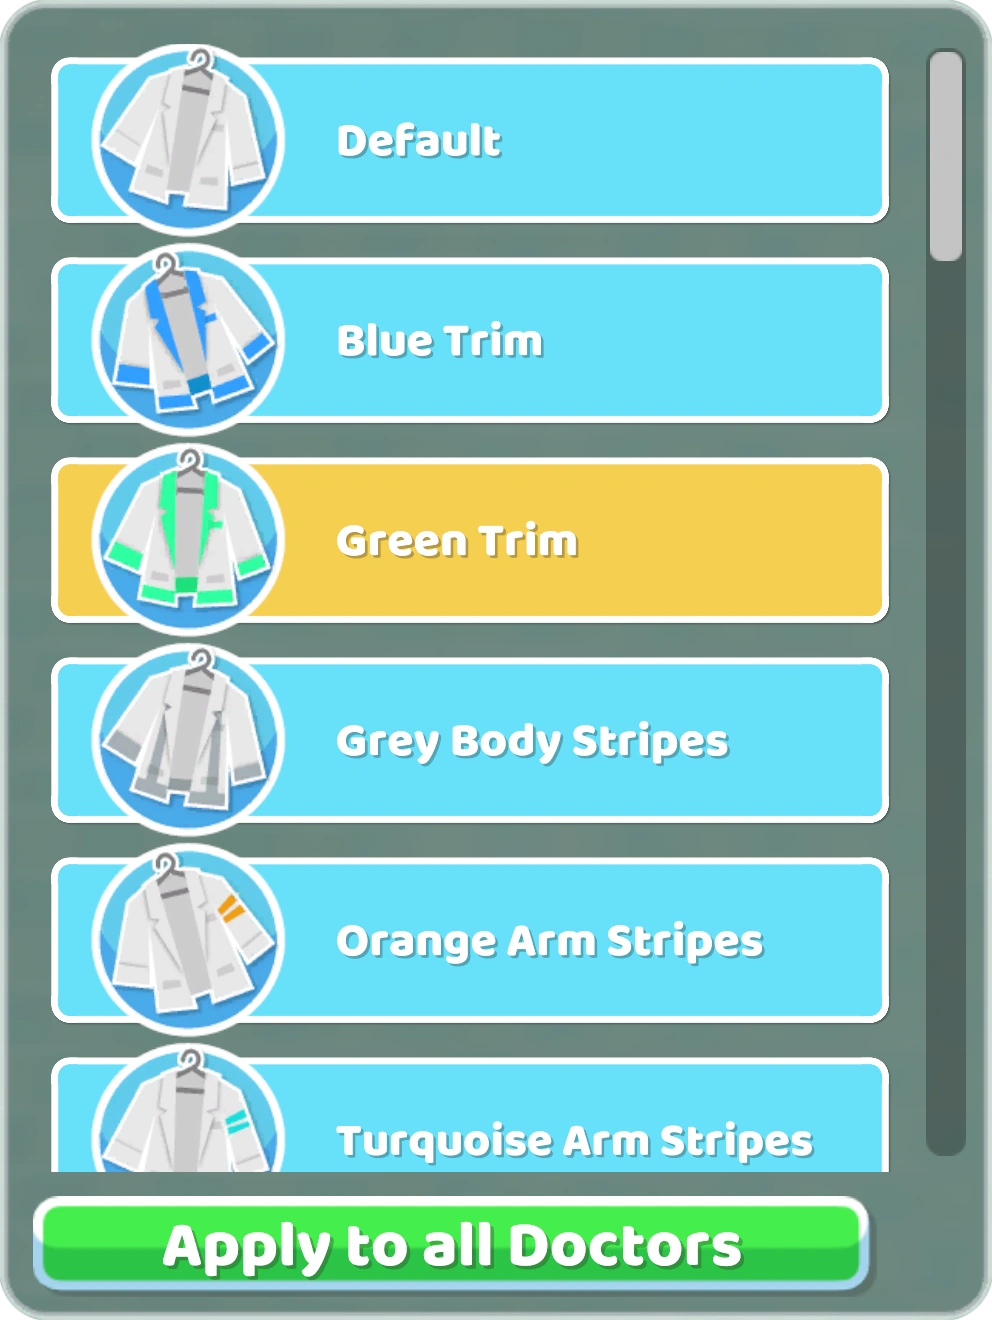
This screen allows for changing the outfit members of staff will wear, with each staff type having various outfits available to choose from. The 'Apply to all' button allows the player to set a different default outfit for existing and future staff members of that particular type, while still allowing for individuals to be given other outfits.
In addition, more outfits have been made available for staff of all types. These can be found in the Fancy Dress Pack DLC, the Jingle Jam Jingle Jimjams release (not currently available), and the Two Point Campus preorder items.
Original Staff Screens
Prior to Update Version 1.16, the Staff List was in the same style as the patient screen. This update brought the new Staff List, with particular focus on the expanded number of job assignments for Doctors and Nurses. This can be seen above; below is a gallery of images from the original look.
")
")
")
")
")
")
")
")
")
")
")